
Manufacturing chenille patches involves a distinct process built around tufting yarn through a backing fabric with a chenille embroidery machine, rather than the flat stitching used in standard embroidery. Digitizing the design correctly, maintaining consistent tufting density, trimming evenly, and finishing the border all directly affect the final patch's quality and durability. Understanding this process helps buyers ask better questions, request meaningful samples, and set realistic expectations for cost and turnaround when sourcing custom chenille patches for teams, schools, or branded merchandise.
Introduction
Chenille patches carry a distinct tufted texture that no other patch type quite replicates, and that texture comes from a manufacturing process very different from standard embroidery or PVC molding. Whether you’re sourcing custom chenille patches for a team, school, or brand, understanding how the production actually works helps you order with confidence and spot quality issues before they become a problem. This guide breaks down exactly how manufacturers make chenille patches, step by step, using commercial chenille embroidery machines.
Featured Snippet Answer
Manufacturers make chenille patches by digitizing a design for chenille-specific stitching, then running a chenille embroidery machine that tufts loops of yarn through a felt or twill backing to build up a raised, textured surface. Once the tufting finishes, workers trim the yarn to an even height, finish the border, and add backing. This process differs from standard embroidery, which uses flat stitching rather than looped, dimensional yarn.
Why This Matters
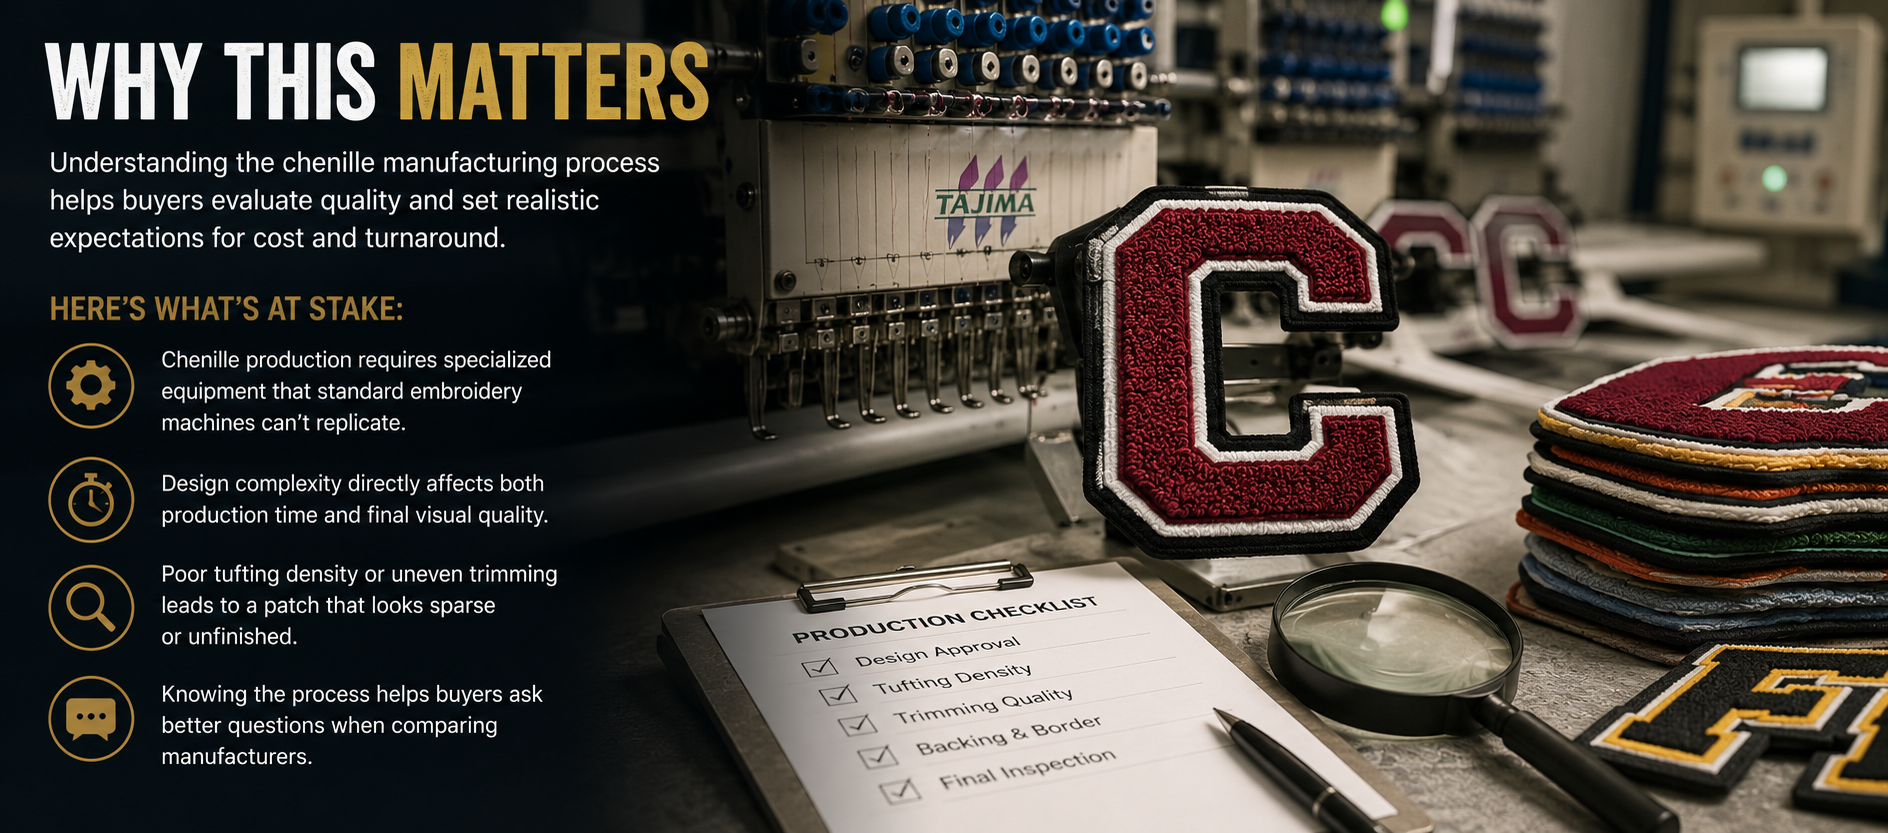
Understanding the chenille manufacturing process helps buyers evaluate quality and set realistic expectations for cost and turnaround.
Here’s what’s at stake:
- Chenille production requires specialized equipment that standard embroidery machines can’t replicate.
- Design complexity directly affects both production time and final visual quality.
- Poor tufting density or uneven trimming leads to a patch that looks sparse or unfinished.
- Knowing the process helps buyers ask better questions when comparing manufacturers.
What Are Chenille Patches
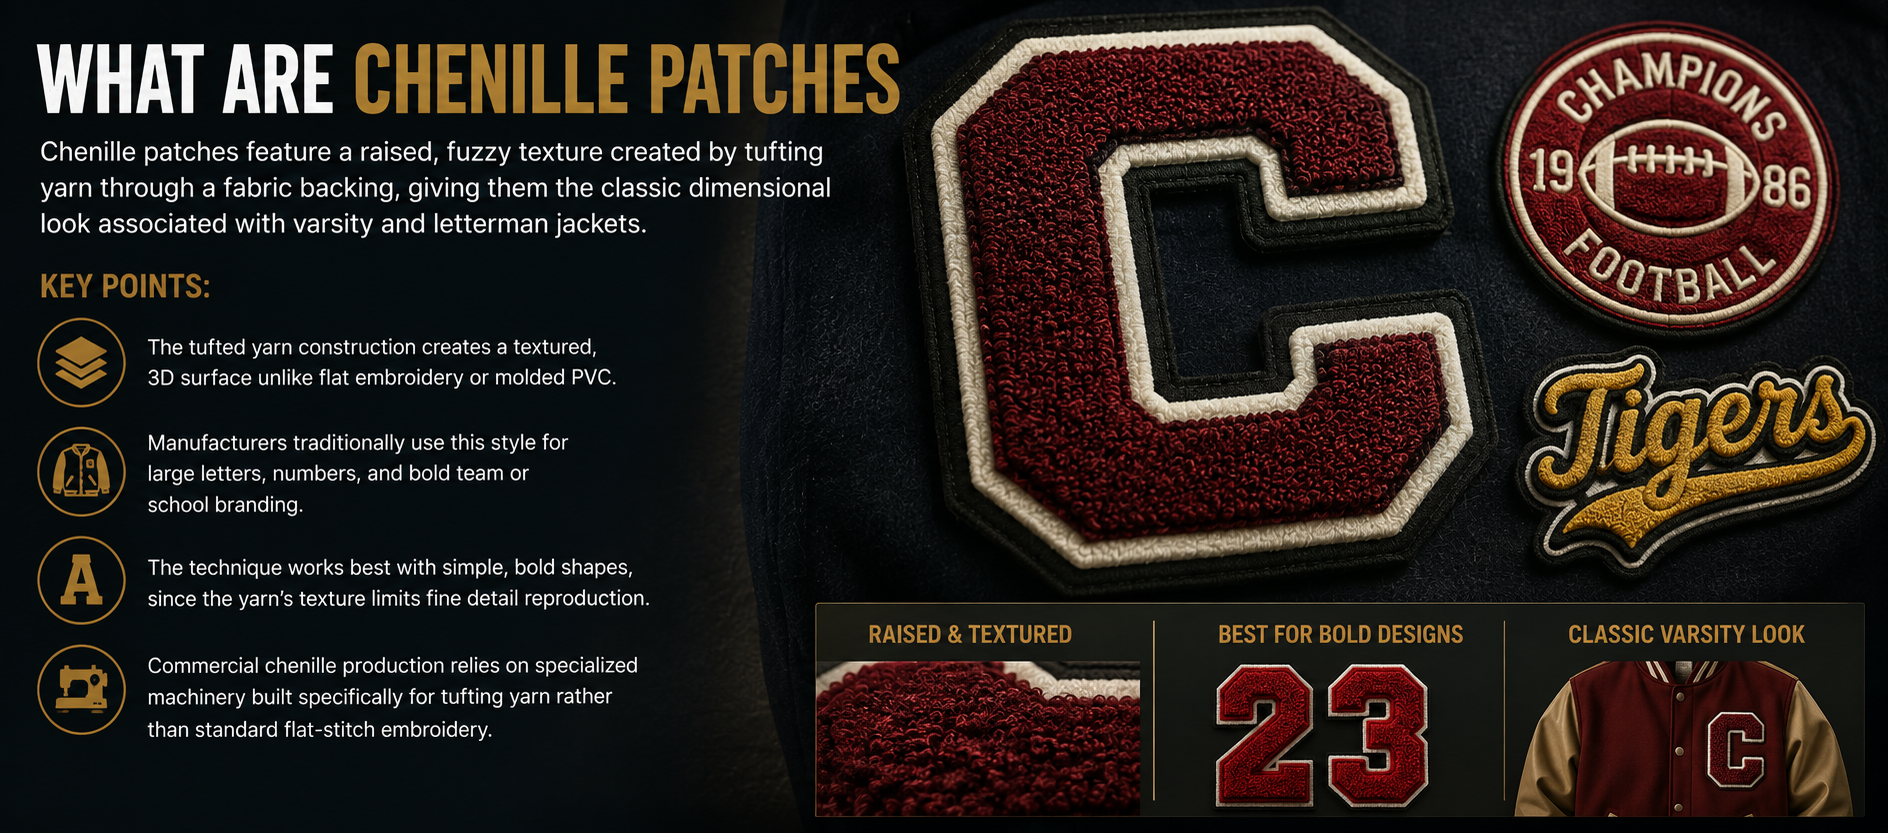
Chenille patches feature a raised, fuzzy texture created by tufting yarn through a fabric backing, giving them the classic dimensional look associated with varsity and letterman jackets.
Key points:
- The tufted yarn construction creates a textured, 3D surface unlike flat embroidery or molded PVC.
- Manufacturers traditionally use this style for large letters, numbers, and bold team or school branding.
- The technique works best with simple, bold shapes, since the yarn’s texture limits fine detail reproduction.
- Commercial chenille production relies on specialized machinery built specifically for tufting yarn rather than standard flat-stitch embroidery.
What a Chenille Embroidery Machine Does Differently
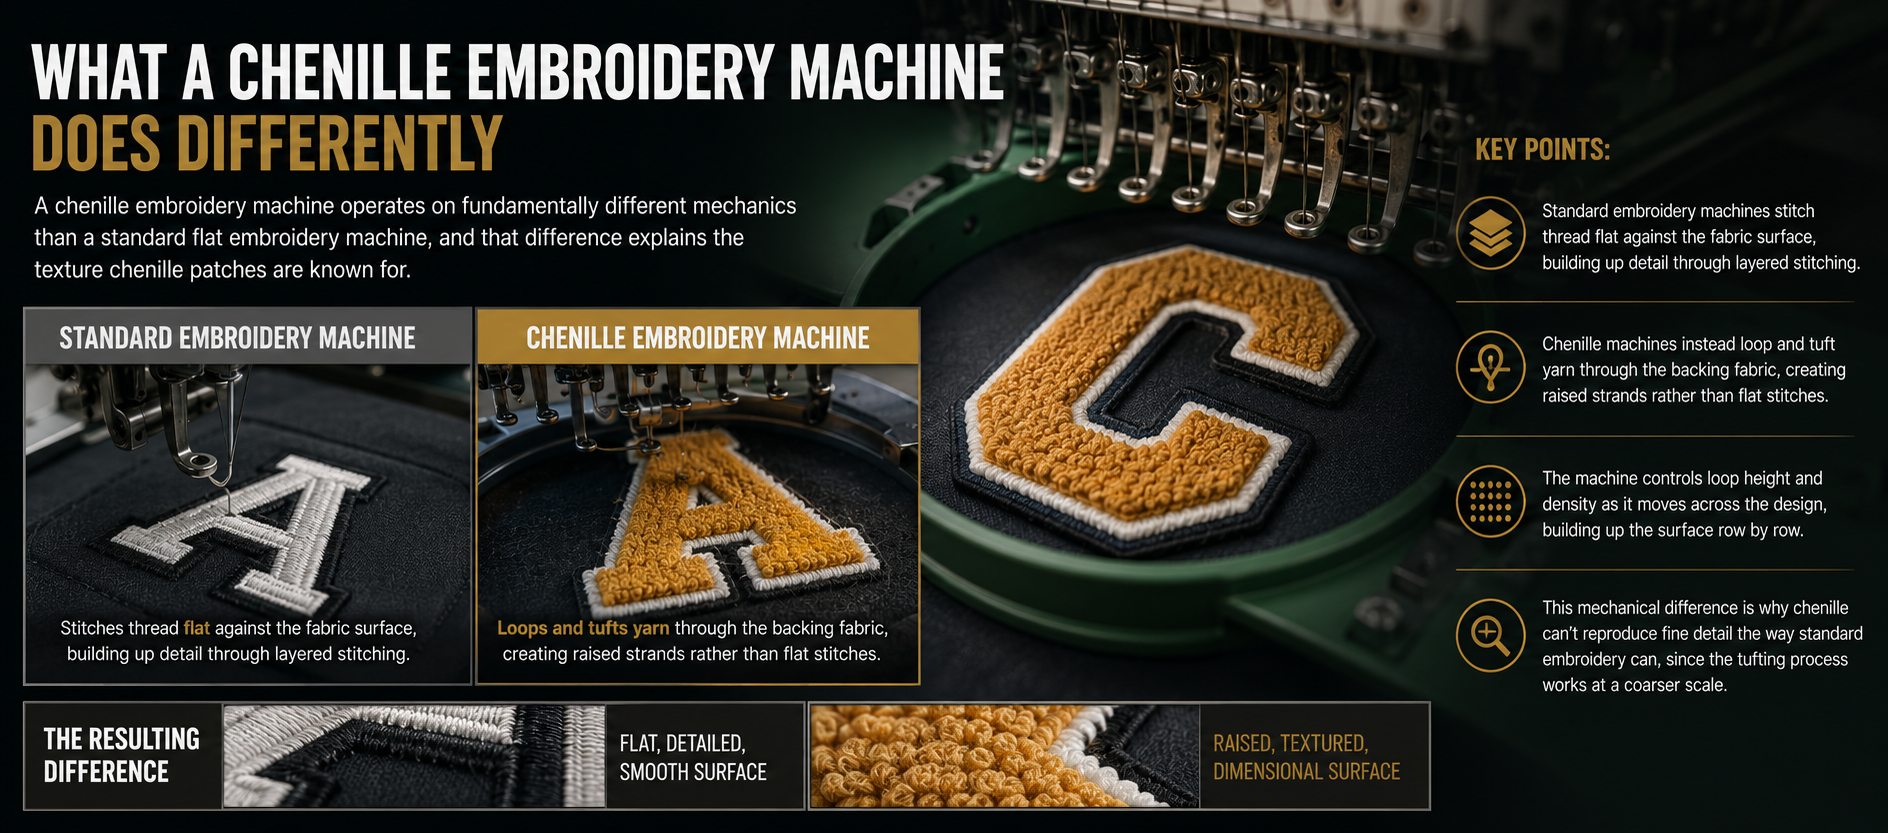
A chenille embroidery machine operates on fundamentally different mechanics than a standard flat embroidery machine, and that difference explains the texture chenille patches are known for.
Key points:
- Standard embroidery machines stitch thread flat against the fabric surface, building up detail through layered stitching.
- Chenille machines instead loop and tuft yarn through the backing fabric, creating raised strands rather than flat stitches.
- The machine controls loop height and density as it moves across the design, building up the surface row by row.
- This mechanical difference is why chenille can’t reproduce fine detail the way standard embroidery can, since the tufting process works at a coarser scale.
What You Need to Make Custom Chenille Patches
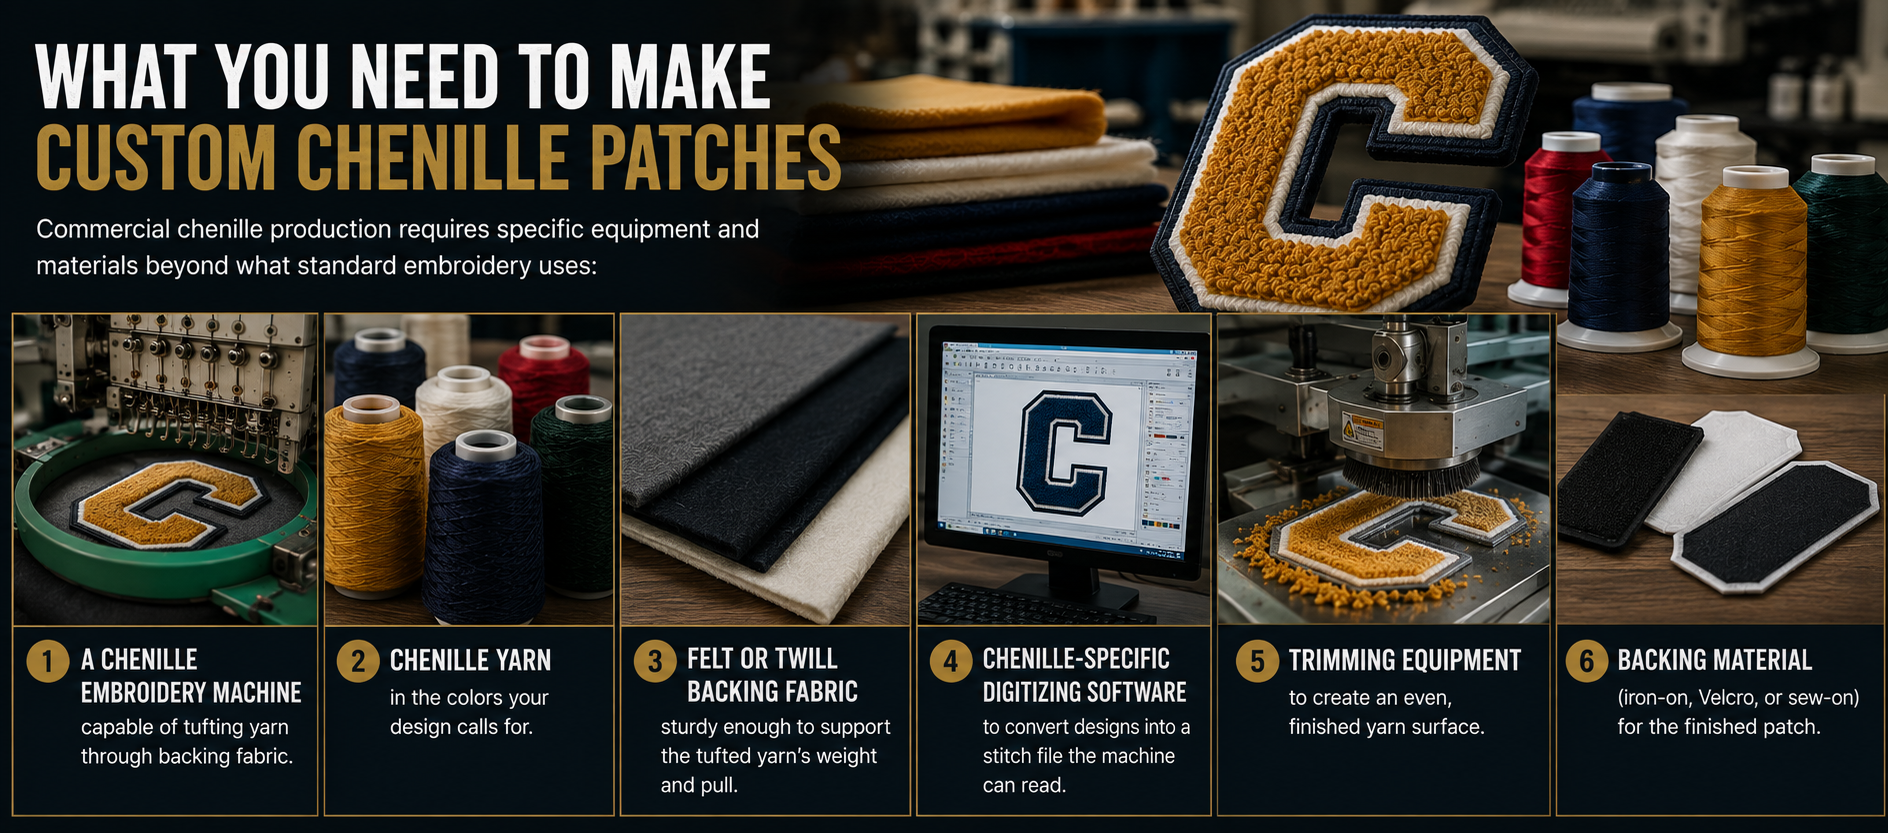
Commercial chenille production requires specific equipment and materials beyond what standard embroidery uses:
- A chenille embroidery machine capable of tufting yarn through backing fabric.
- Chenille yarn in the colors your design calls for.
- Felt or twill backing fabric sturdy enough to support the tufted yarn’s weight and pull.
- Chenille-specific digitizing software to convert designs into a stitch file the machine can read.
- Trimming equipment to create an even, finished yarn surface.
- Backing material (iron-on, Velcro, or sew-on) for the finished patch.
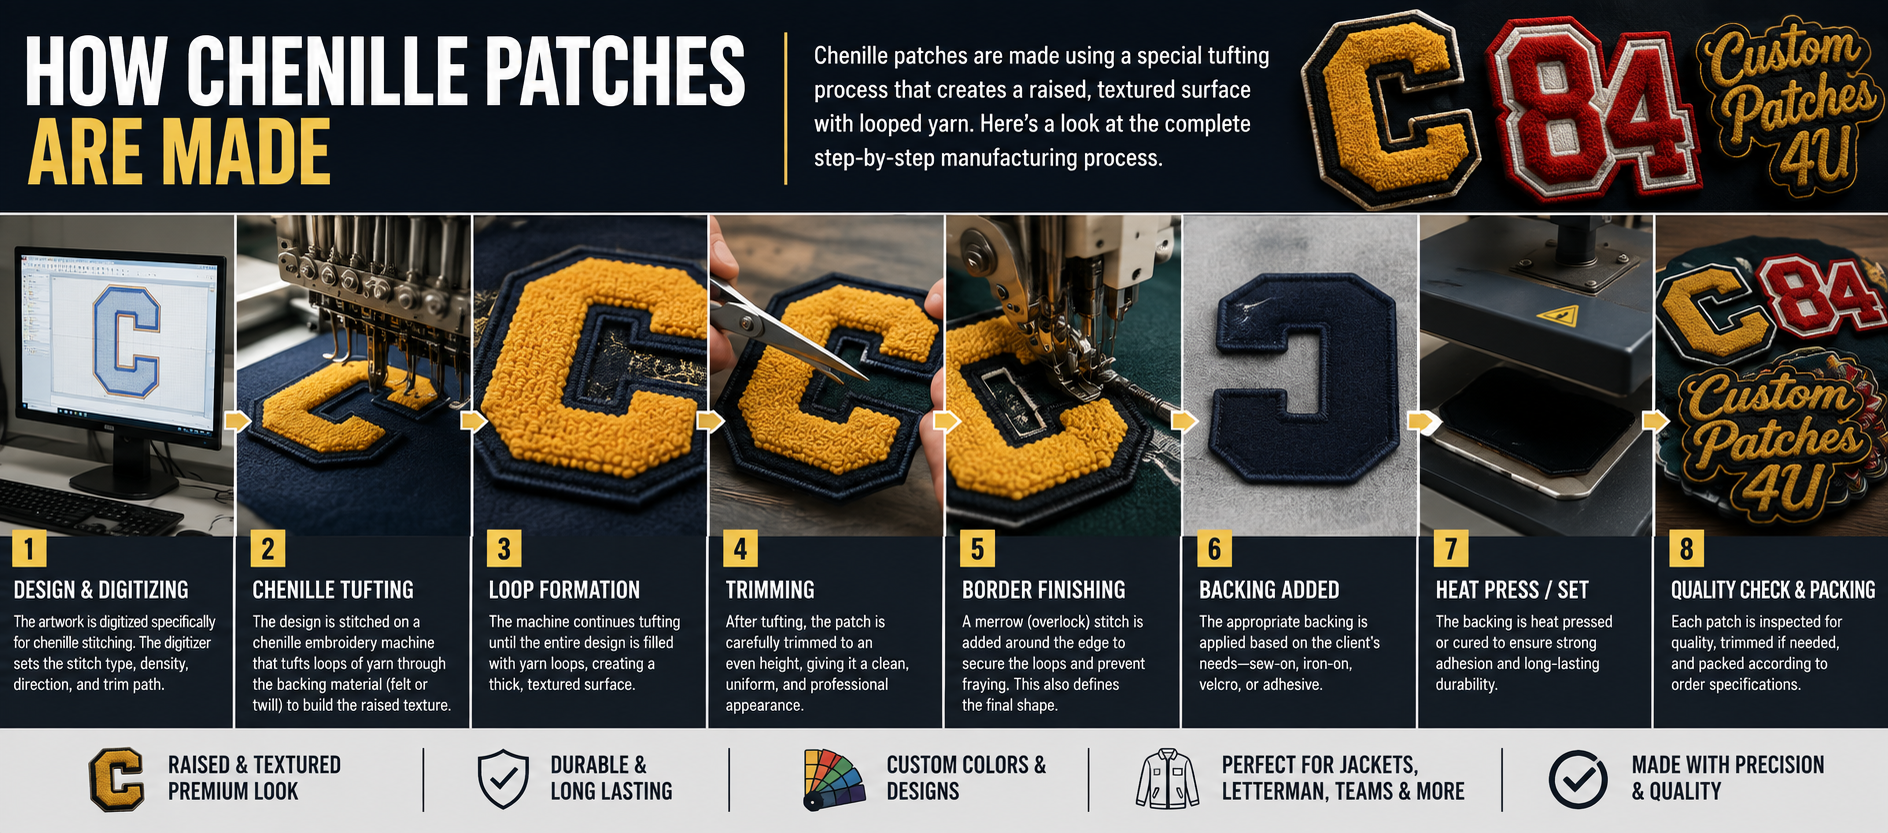
How to Make Chenille Patches with a Machine: Full Step-by-Step Process
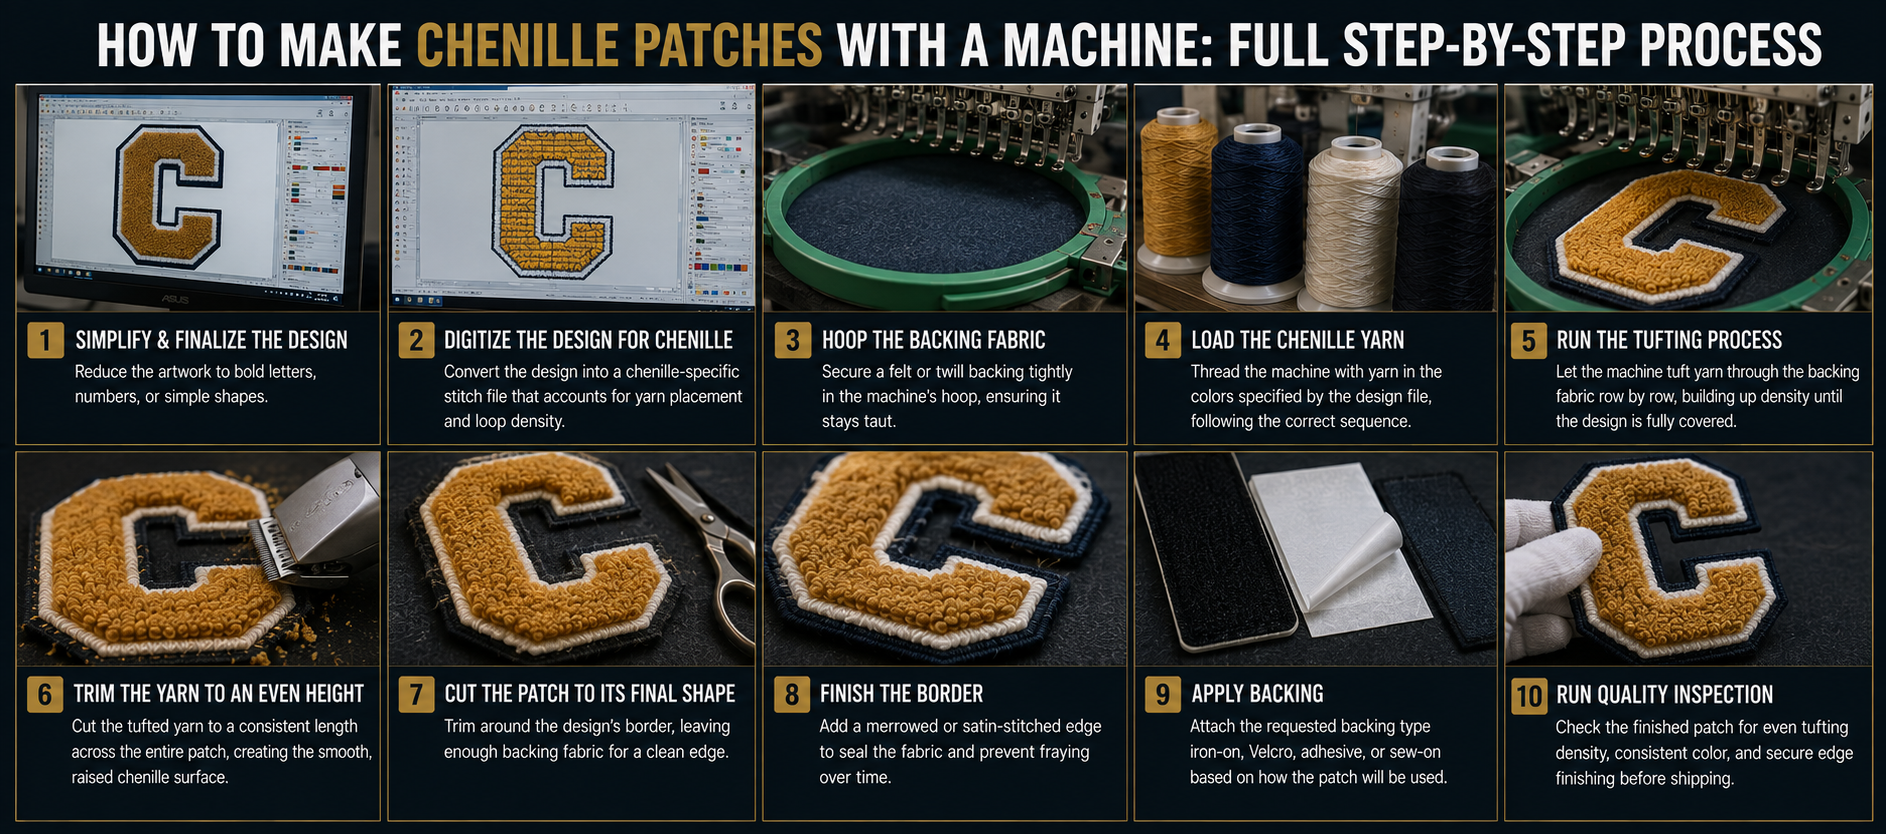
Here’s how commercial manufacturers produce chenille patches using a chenille embroidery machine:
- Step 1: Simplify and Finalize the Design Reduce the artwork to bold letters, numbers, or simple shapes, since chenille’s texture can’t capture fine detail cleanly.
- Step 2: Digitize the Design for Chenille Convert the design into a chenille-specific stitch file, which differs from standard embroidery digitizing since it needs to account for yarn placement and loop density rather than flat stitch paths.
- Step 3: Hoop the Backing Fabric Secure a felt or twill backing tightly in the machine’s hoop, ensuring it stays taut throughout the tufting process.
- Step 4: Load the Chenille Yarn Thread the machine with yarn in the colors specified by the design file, following the correct sequence for color changes.
- Step 5: Run the Tufting Process Let the machine tuft yarn through the backing fabric row by row, building up density until the entire design area reaches full coverage.
- Step 6: Trim the Yarn to an Even Height Cut the tufted yarn to a consistent length across the entire patch, creating the smooth, raised chenille surface.
- Step 7: Cut the Patch to Its Final Shape Trim around the design’s border, leaving enough backing fabric for a clean edge.
- Step 8: Finish the Border Add a merrowed or satin-stitched edge to seal the fabric and prevent fraying over time.
- Step 9: Apply Backing Attach the requested backing type iron-on, Velcro, adhesive, or sew-on based on how the finished patch will be used.
- Step 10: Run Quality Inspection Check the finished patch for even tufting density, consistent color, and secure edge finishing before shipping.
Design Considerations for Chenille Manufacturing
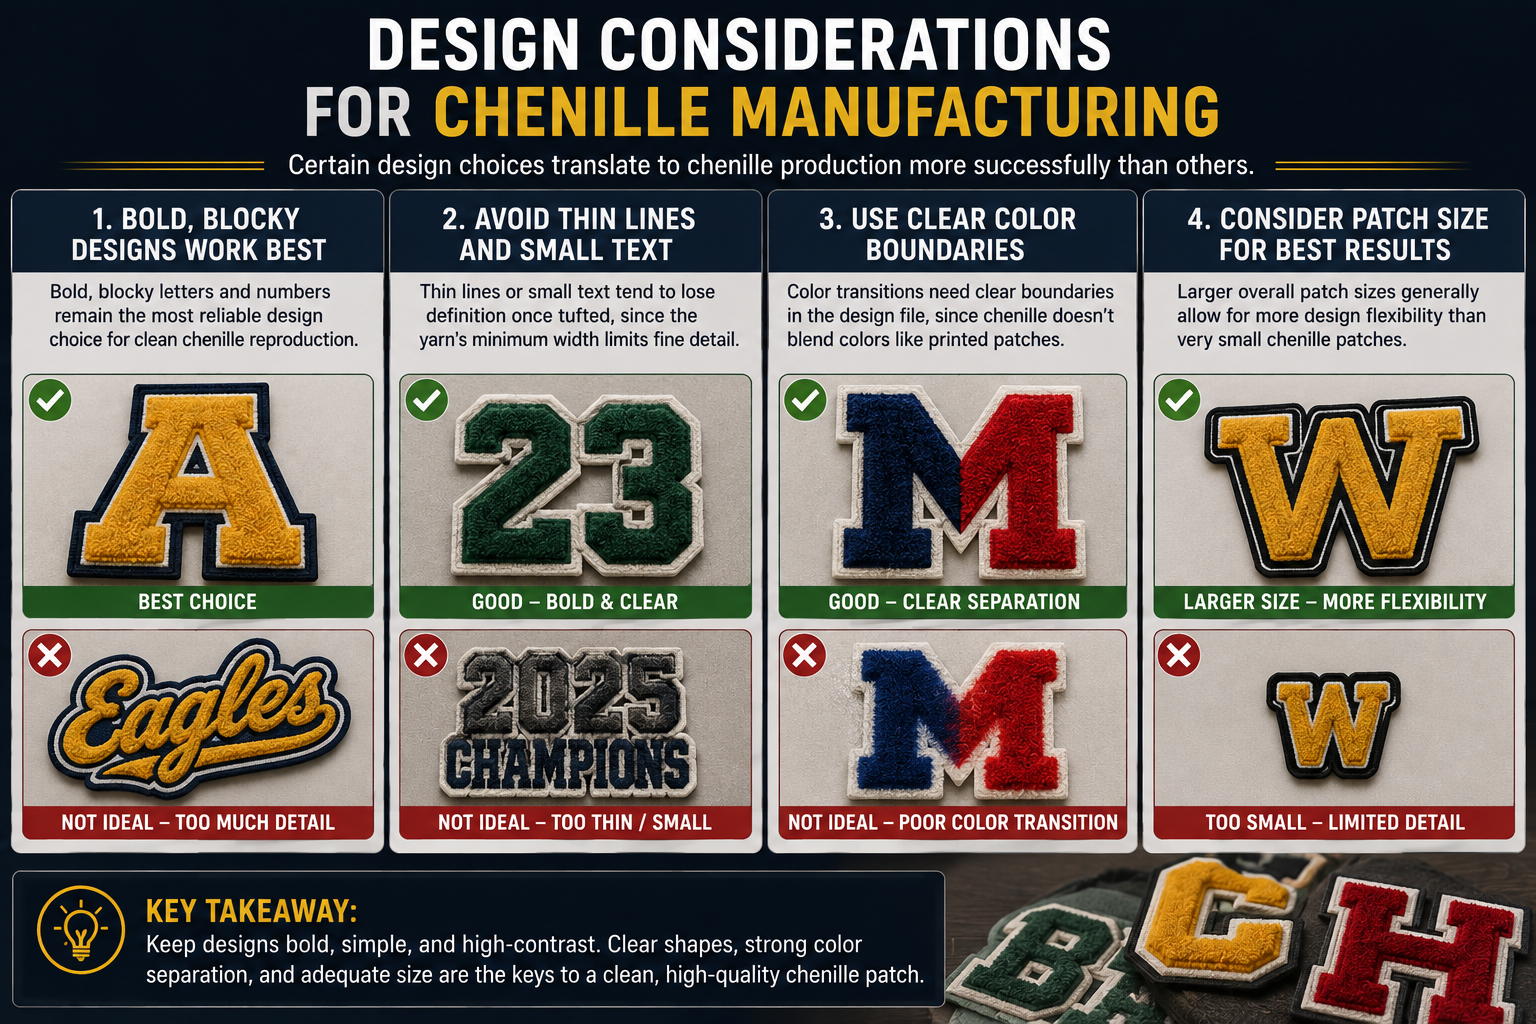
Certain design choices translate to chenille production more successfully than others. Key considerations:
- Bold, blocky letters and numbers remain the most reliable design choice for clean chenille reproduction.
- Thin lines or small text tend to lose definition once tufted, since the yarn’s minimum width limits fine detail.
- Color transitions need clear boundaries in the design file, since chenille doesn’t blend colors the way printed or sublimated patches can.
- Larger overall patch sizes generally allow for more design flexibility than very small chenille patches.
Backing and Finishing Options
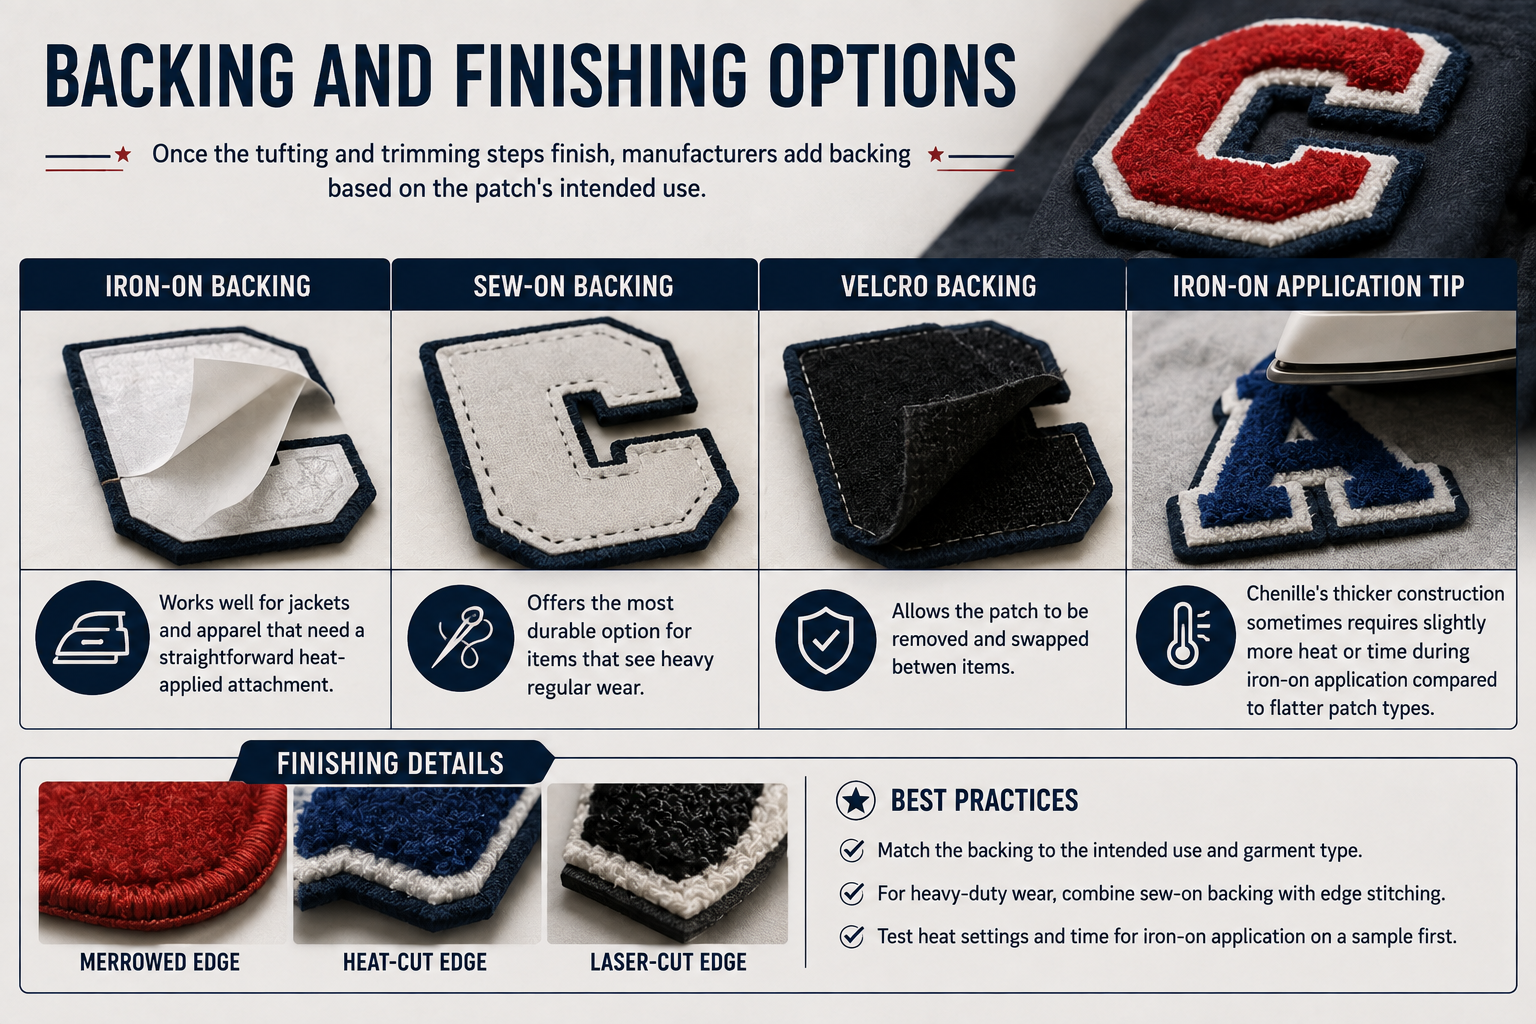
Once the tufting and trimming steps finish, manufacturers add backing based on the patch’s intended use.
Key points:
- Iron-on backing works well for jackets and apparel that need a straightforward heat-applied attachment.
- Sew-on backing offers the most durable option for items that see heavy regular wear.
- Velcro backing allows the patch to be removed and swapped between items.
- Chenille’s thicker construction sometimes requires slightly more heat or time during iron-on application compared to flatter patch types.
Comparison Table Chenille vs. Standard Embroidery Production
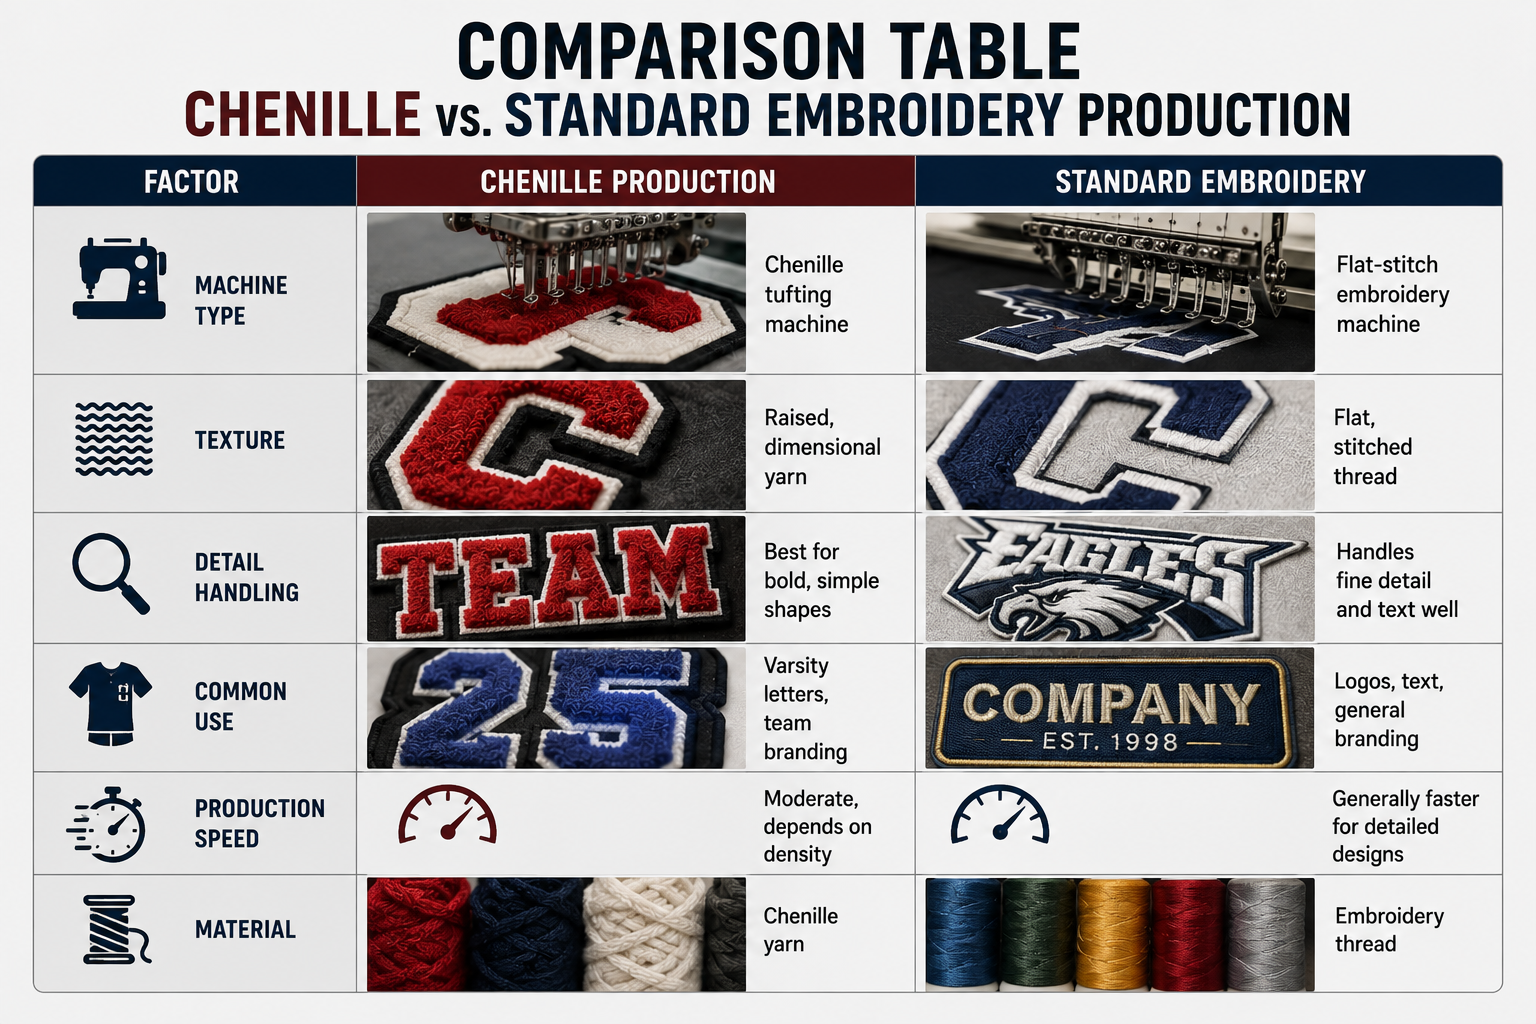
| Factor | Chenille Production | Standard Embroidery |
|---|---|---|
| Machine Type | Chenille tufting machine | Flat-stitch embroidery machine |
| Texture | Raised, dimensional yarn | Flat, stitched thread |
| Detail Handling | Best for bold, simple shapes | Handles fine detail and text well |
| Common Use | Varsity letters, team branding | Logos, text, general branding |
| Production Speed | Moderate, depends on density | Generally faster for detailed designs |
| Material | Chenille yarn | Embroidery thread |
Quality Factors That Affect the Final Patch
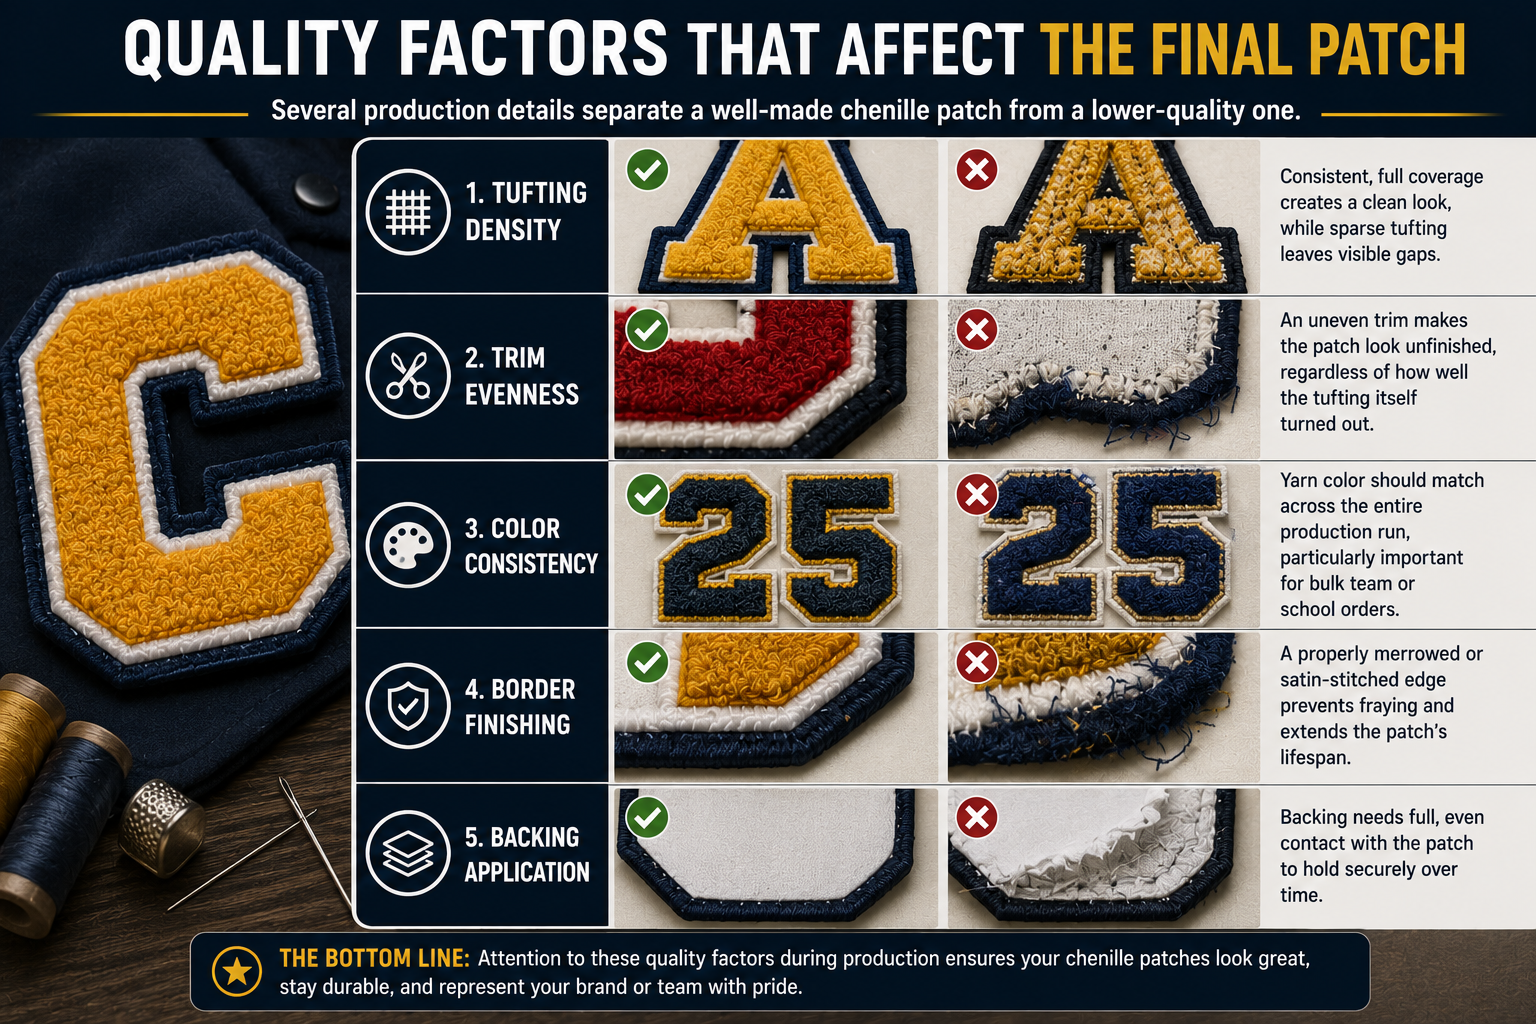
Several production details separate a well-made chenille patch from a lower-quality one. Key factors:
- Tufting density: Consistent, full coverage creates a clean look, while sparse tufting leaves visible gaps.
- Trim evenness: An uneven trim makes the patch look unfinished, regardless of how well the tufting itself turned out.
- Color consistency: Yarn color should match across the entire production run, particularly important for bulk team or school orders.
- Border finishing: A properly merrowed or satin-stitched edge prevents fraying and extends the patch’s lifespan.
- Backing application: Backing needs full, even contact with the patch to hold securely over time.
Buying Guide
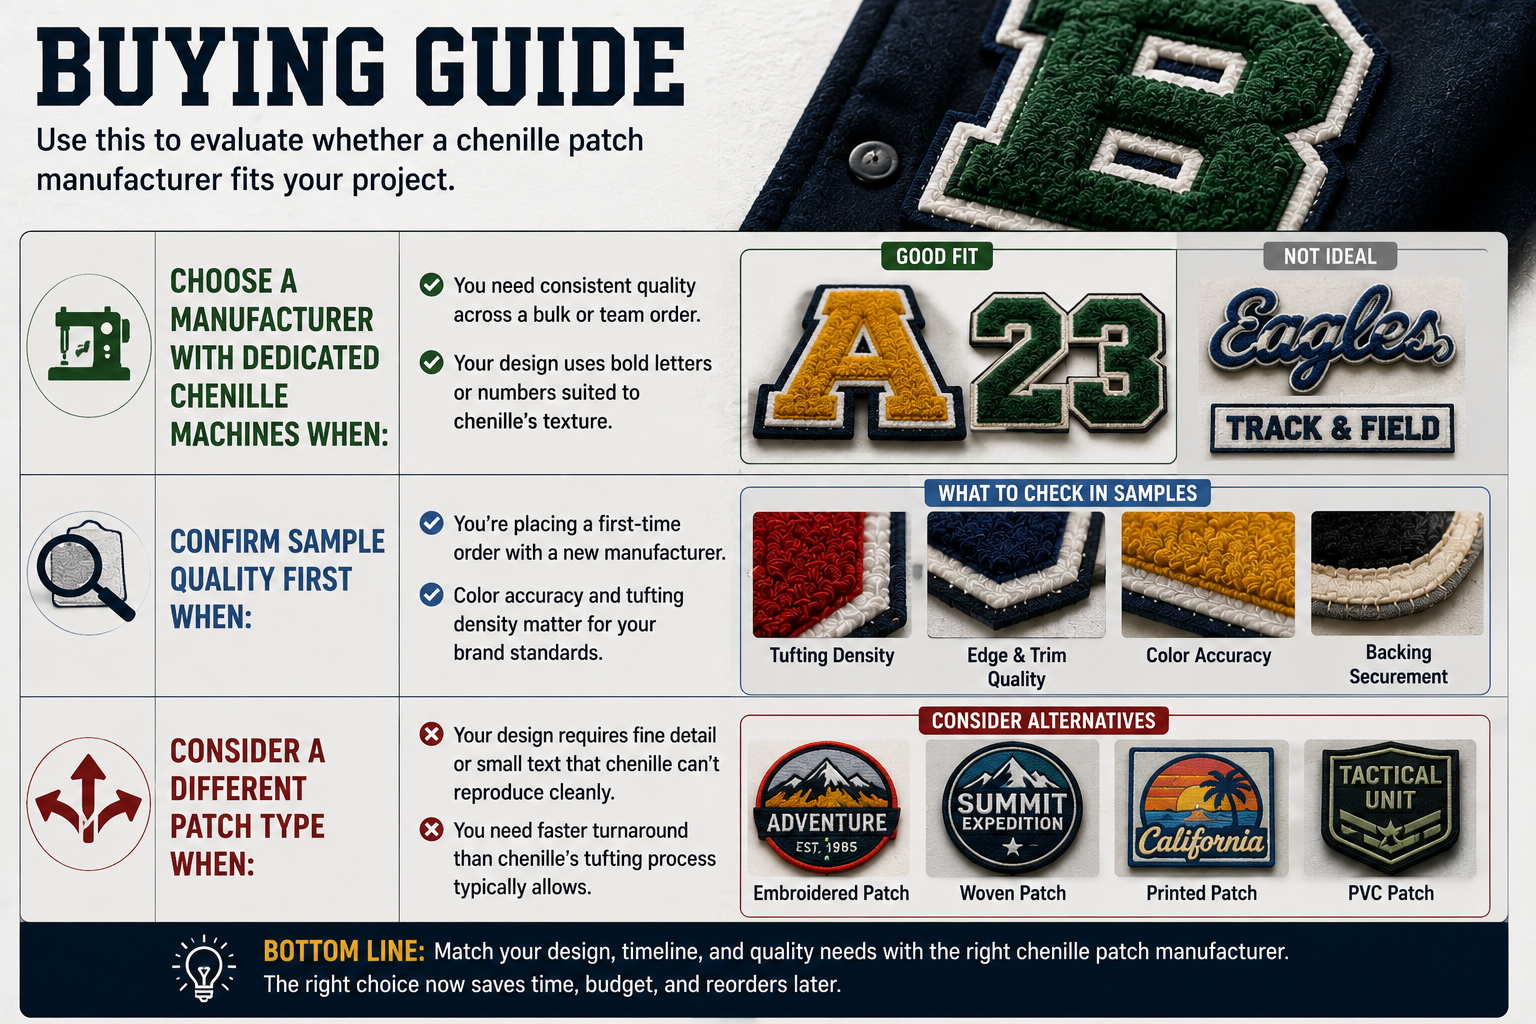
Use this to evaluate whether a chenille patch manufacturer fits your project:
- Choose a manufacturer with dedicated chenille machines when:
- You need consistent quality across a bulk or team order.
- Your design uses bold letters or numbers suited to chenille’s texture.
- Confirm sample quality first when:
- You’re placing a first-time order with a new manufacturer.
- Color accuracy and tufting density matter for your brand standards.
- Consider a different patch type when:
- Your design requires fine detail or small text that chenille can’t reproduce cleanly.
- You need faster turnaround than chenille’s tufting process typically allows.
Common Mistakes
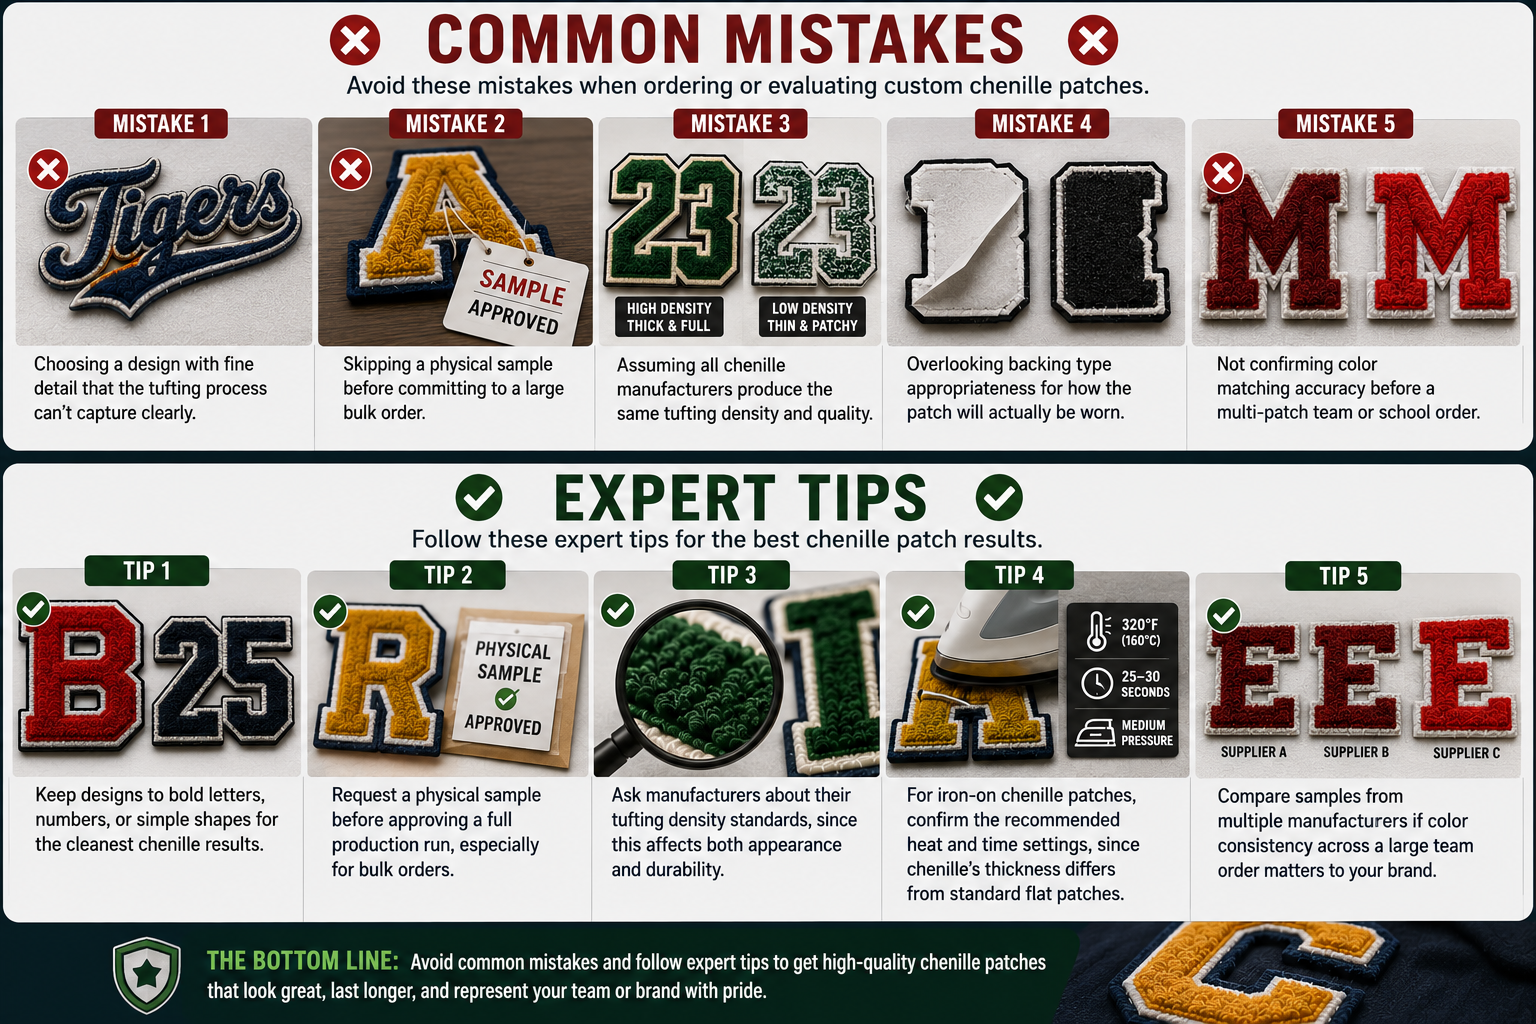
Avoid these mistakes when ordering or evaluating custom chenille patches:
- Mistake 1: Choosing a design with fine detail that the tufting process can’t capture clearly.
- Mistake 2: Skipping a physical sample before committing to a large bulk order.
- Mistake 3: Assuming all chenille manufacturers produce the same tufting density and quality.
- Mistake 4: Overlooking backing type appropriateness for how the patch will actually be worn.
- Mistake 5: Not confirming color matching accuracy before a multi-patch team or school order.
Expert Tips
- Tip 1: Keep designs to bold letters, numbers, or simple shapes for the cleanest chenille results.
- Tip 2: Request a physical sample before approving a full production run, especially for bulk orders.
- Tip 3: Ask manufacturers about their tufting density standards, since this affects both appearance and durability.
- Tip 4: For iron-on chenille patches, confirm the recommended heat and time settings, since chenille’s thickness differs from standard flat patches.
- Tip 5: Compare samples from multiple manufacturers if color consistency across a large team order matters to your brand.
Pricing Factors
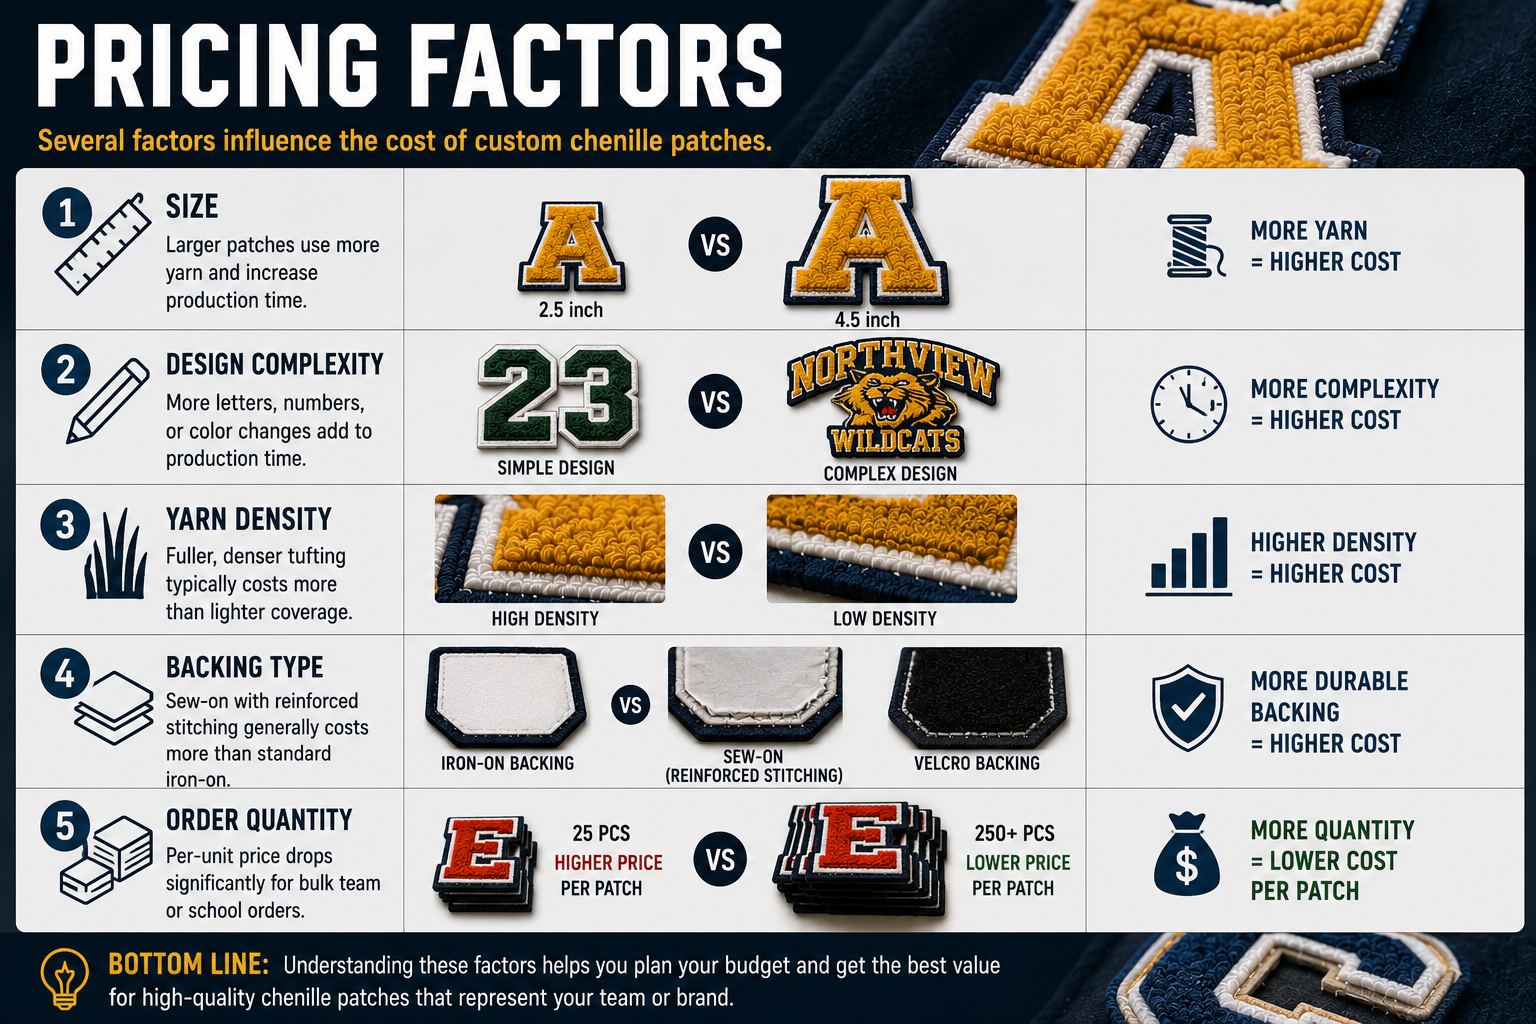
Several factors influence the cost of custom chenille patches:
- Size: Larger patches use more yarn and increase production time.
- Design complexity: More letters, numbers, or color changes add to production time.
- Yarn density: Fuller, denser tufting typically costs more than lighter coverage.
- Backing type: Sew-on with reinforced stitching generally costs more than standard iron-on.
- Order quantity: Per-unit price drops significantly for bulk team or school orders.
Ordering Process
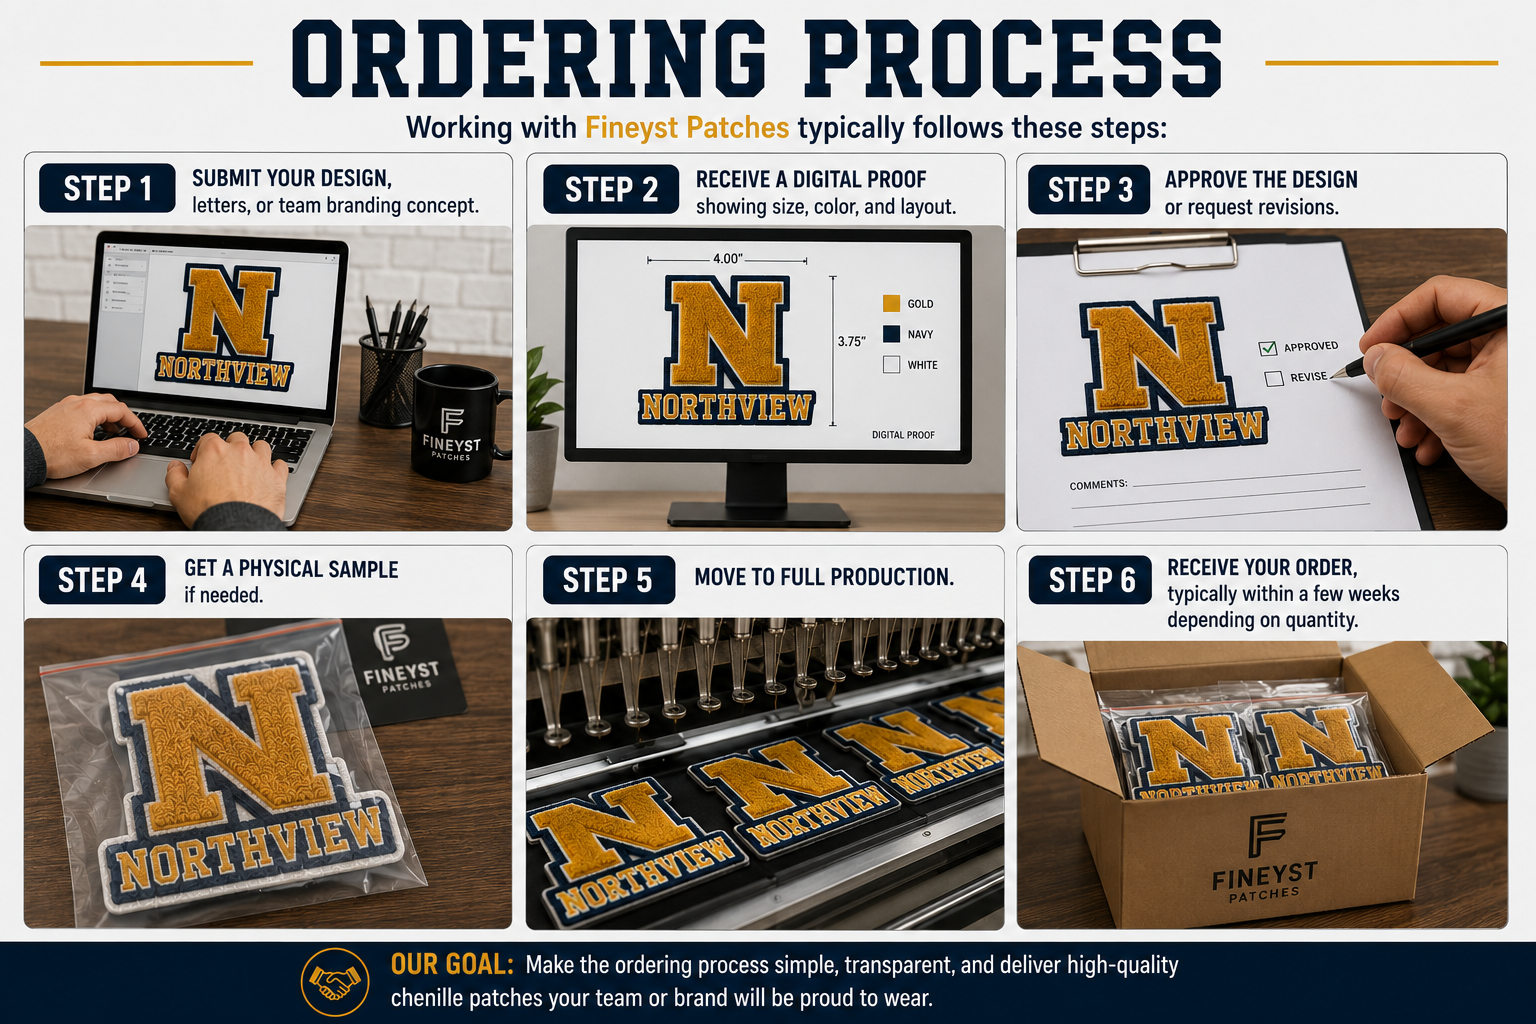
Working with Fineyst Patches typically follows these steps:
- Step 1: Submit your design, letters, or team branding concept.
- Step 2: Receive a digital proof showing size, color, and layout.
- Step 3: Approve the design or request revisions.
- Step 4: Get a physical sample if needed.
- Step 5: Move to full production.
- Step 6: Receive your order, typically within a few weeks depending on quantity.
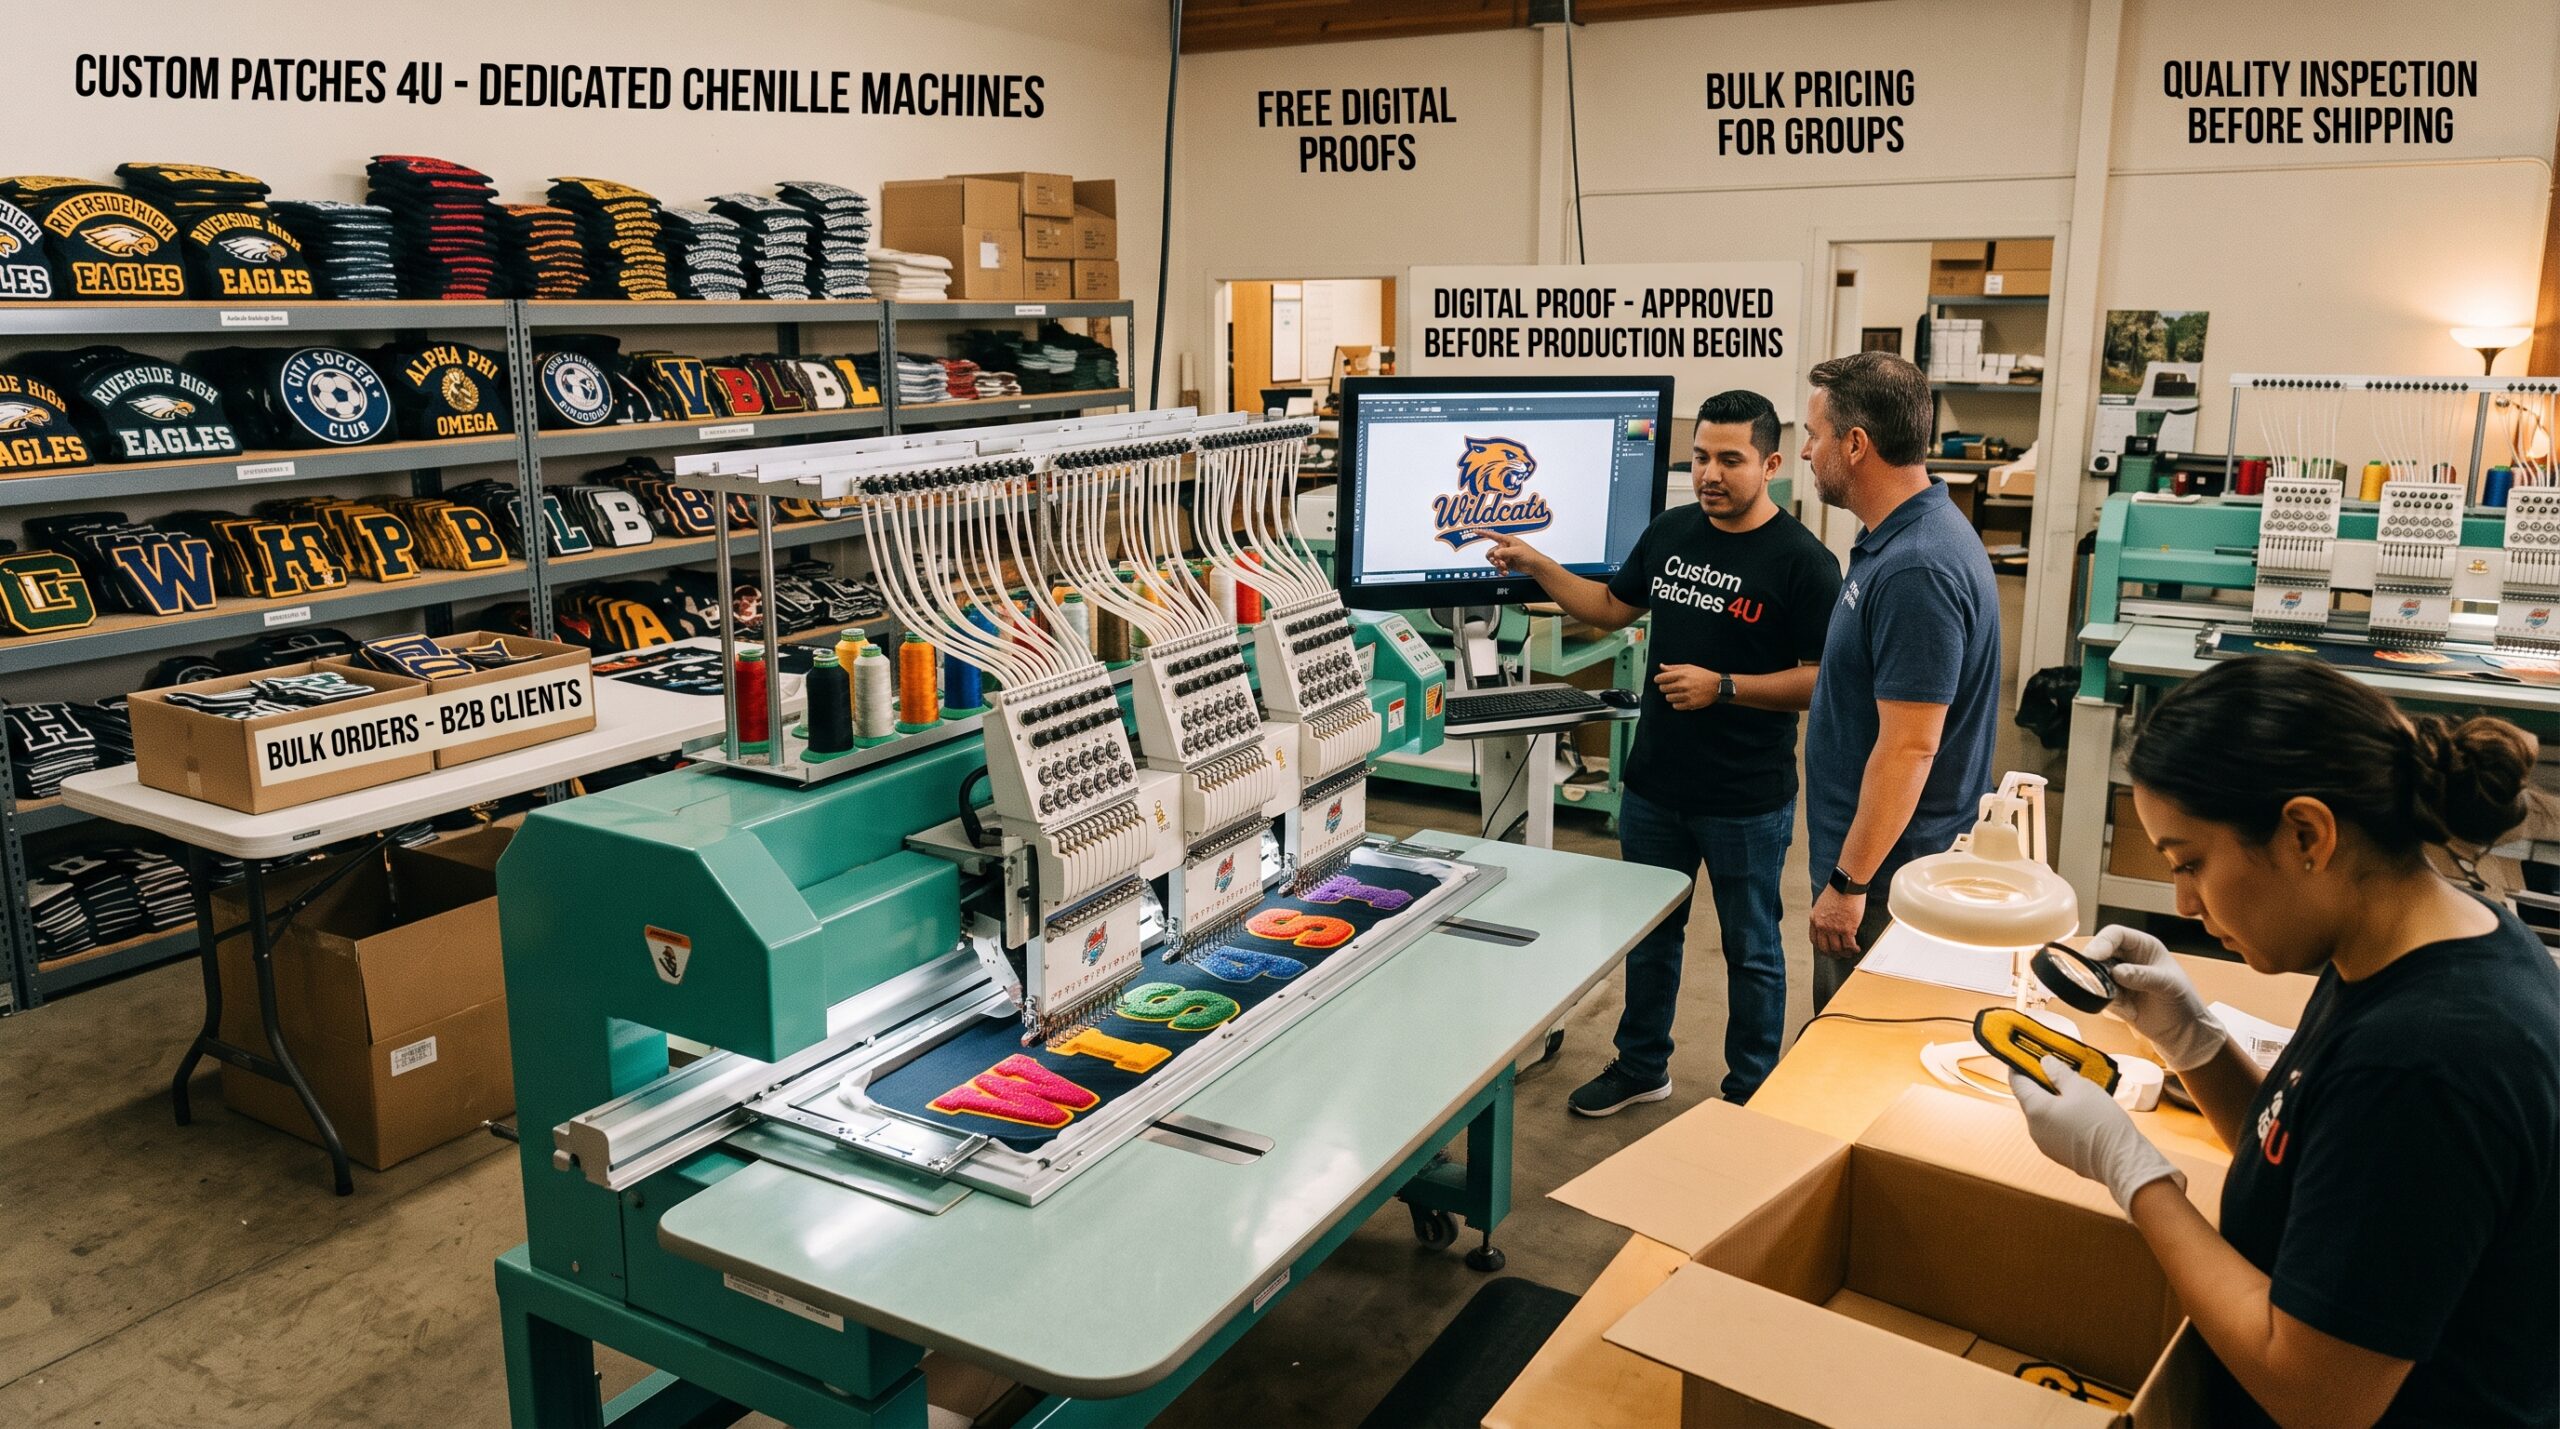
Why Choose Custom Patches 4U
Reasons B2B and B2C buyers choose Custom Patches 4U for custom chenille manufacturing:
- Dedicated chenille embroidery machines built for consistent, dense tufting.
- Free digital proofs before production begins.
- Bulk pricing for teams, schools, and organizations.
- Quality inspection on every order to catch tufting or trimming issues before shipping.
FAQs
How do manufacturers make chenille patches?
They digitize the design for chenille-specific stitching, tuft yarn through a backing fabric using a chenille embroidery machine, trim the yarn evenly, finish the border, then add backing.
How do you make chenille patches with a machine?
A chenille embroidery machine loops and tufts yarn through hooped backing fabric according to a digitized stitch file, building up density row by row until the design is complete.
What does a chenille embroidery machine do?
It tufts loops of yarn through fabric to create a raised, textured surface, unlike standard embroidery machines that stitch thread flat against the fabric.
Can custom chenille patches include multiple colors?
Yes, though each color needs a clear boundary in the design file, since chenille doesn’t blend colors the way sublimation or printing can.
Why can’t chenille patches show fine detail?
The tufting process works at a coarser scale than flat embroidery, so thin lines and small text lose definition once the yarn is looped and trimmed.
How long does it take to manufacture custom chenille patches?
Turnaround varies by design complexity and order size, but chenille production generally takes longer per unit than standard flat embroidery due to the tufting and trimming steps.
What backing works best for chenille patches?
Iron-on works well for standard use, while sew-on offers more durability for heavy-wear items like varsity jackets that see regular washing.
What causes uneven chenille patches?
Inconsistent tufting density or an uneven trim are the most common causes, both of which come down to production quality control.
Is chenille patch production more expensive than standard embroidery?
It can be, depending on size and yarn density, since chenille requires specialized equipment and generally more material per patch than flat embroidery.
Can I get a sample before ordering custom chenille patches in bulk?
Yes, most manufacturers, including Fineyst Patches, can provide a physical sample before committing to a full production run.
Start Your Custom Chenille Patch Order
If you're ready to order custom chenille patches for a team, school, or brand, send us your design and we'll walk you through the process from digitizing to finished production. Fineyst Patches offers free digital proofs and bulk pricing so you can move forward with confidence.